Encapsulated O-Rings Installation Guide
Learn how to install Teflon® encapsulated O-rings, including proper handling, surface preparation, heating, stretch limits, lubrication, compression, and final inspection.
This guide is written for engineers, maintenance teams, buyers, and quality departments working with FEP and PFA encapsulated seals.
Installation Topics
Why Installation Procedure Matters
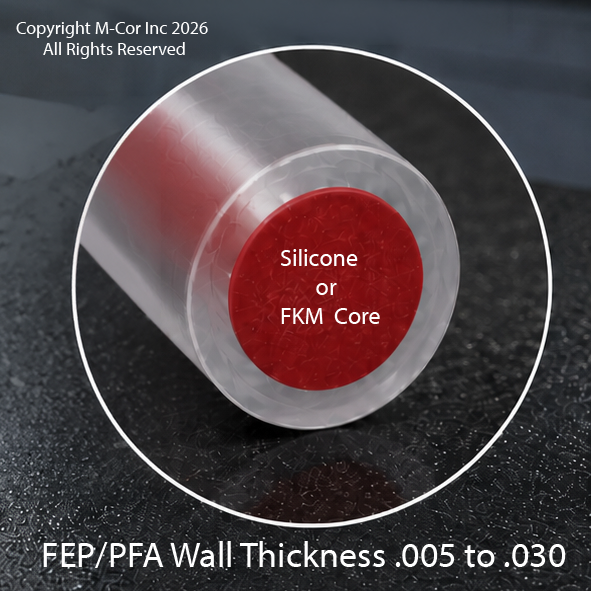
A Teflon® encapsulated O-ring, often called a TEOR seal, does not install exactly like a standard molded rubber O-ring. The FEP or PFA jacket provides chemical resistance, while the elastomer core provides sealing force and recovery.
The jacket gives the seal its chemical advantage, but it also requires careful handling. If the seal is stretched too far, bent sharply, forced across burrs, or installed cold into a difficult groove, the jacket can kink, crease, split, or become permanently damaged.
FEP/PFA Jacket
Chemical barrier and low-contamination sealing surface.
Elastomer Core
Compression, recovery, and sealing force.
Installation Care
Controls stretch, twisting, pinching, and jacket damage.
Step 1 — Inspect and Prepare the Groove
Before installing the O-ring, inspect the gland, groove, shaft, flange, or sealing surface. The installation area should be clean, smooth, and free from sharp edges.
- Remove burrs, chips, metal slivers, and contamination.
- Inspect for sharp edges, machining marks, and scratches.
- Protect the O-ring from threads, ports, keyways, and shoulders.
- Use an installation cone, sleeve, or protective cover when required.
- Confirm that the gland design allows the seal to seat evenly.
Important: Do not force an encapsulated O-ring across a sharp corner. A sharp edge can cut or score the FEP/PFA jacket before the seal ever enters service.
Step 2 — Confirm the Seal Is Correct for the Application
Before installation, confirm that the seal matches the application, equipment drawing, gland design, and operating conditions.
Confirm the Part Details
- Part number
- Inside diameter
- Cross-section
- FEP or PFA jacket
- Silicone, Viton®/FKM, hollow, or specialty core
Confirm the Application
- Media compatibility
- Temperature range
- Pressure conditions
- Static or dynamic service
- Cleaning, sterilization, or validation requirements
Teflon® encapsulated O-rings are commonly used in chemical processing, pharmaceutical, food, semiconductor, filtration, pump, valve, and other critical applications. Final seal selection should always match the actual operating environment.
Step 3 — Heat the O-Ring for Difficult Installations
For easy face-seal installations, heating may not be required. For difficult installations, especially when the O-ring must stretch over a shaft or fit into a confined groove, gentle heating can make the seal more flexible.
Preferred
Hot water or boiling water. This provides even heating and reduces the chance of local overheating.
Acceptable
Controlled hot air oven. Use care to avoid overheating the seal.
Use Caution
Heat guns can create hot spots. Keep heat moving and avoid direct concentrated heat.
Do not use open flame. Do not overheat the seal. Do not leave a heated O-ring resting against a sharp metal edge.
Step 4 — Understand Diameter Stretch
Stretch occurs when the O-ring inside diameter is smaller than the shaft or groove diameter and must expand during installation.
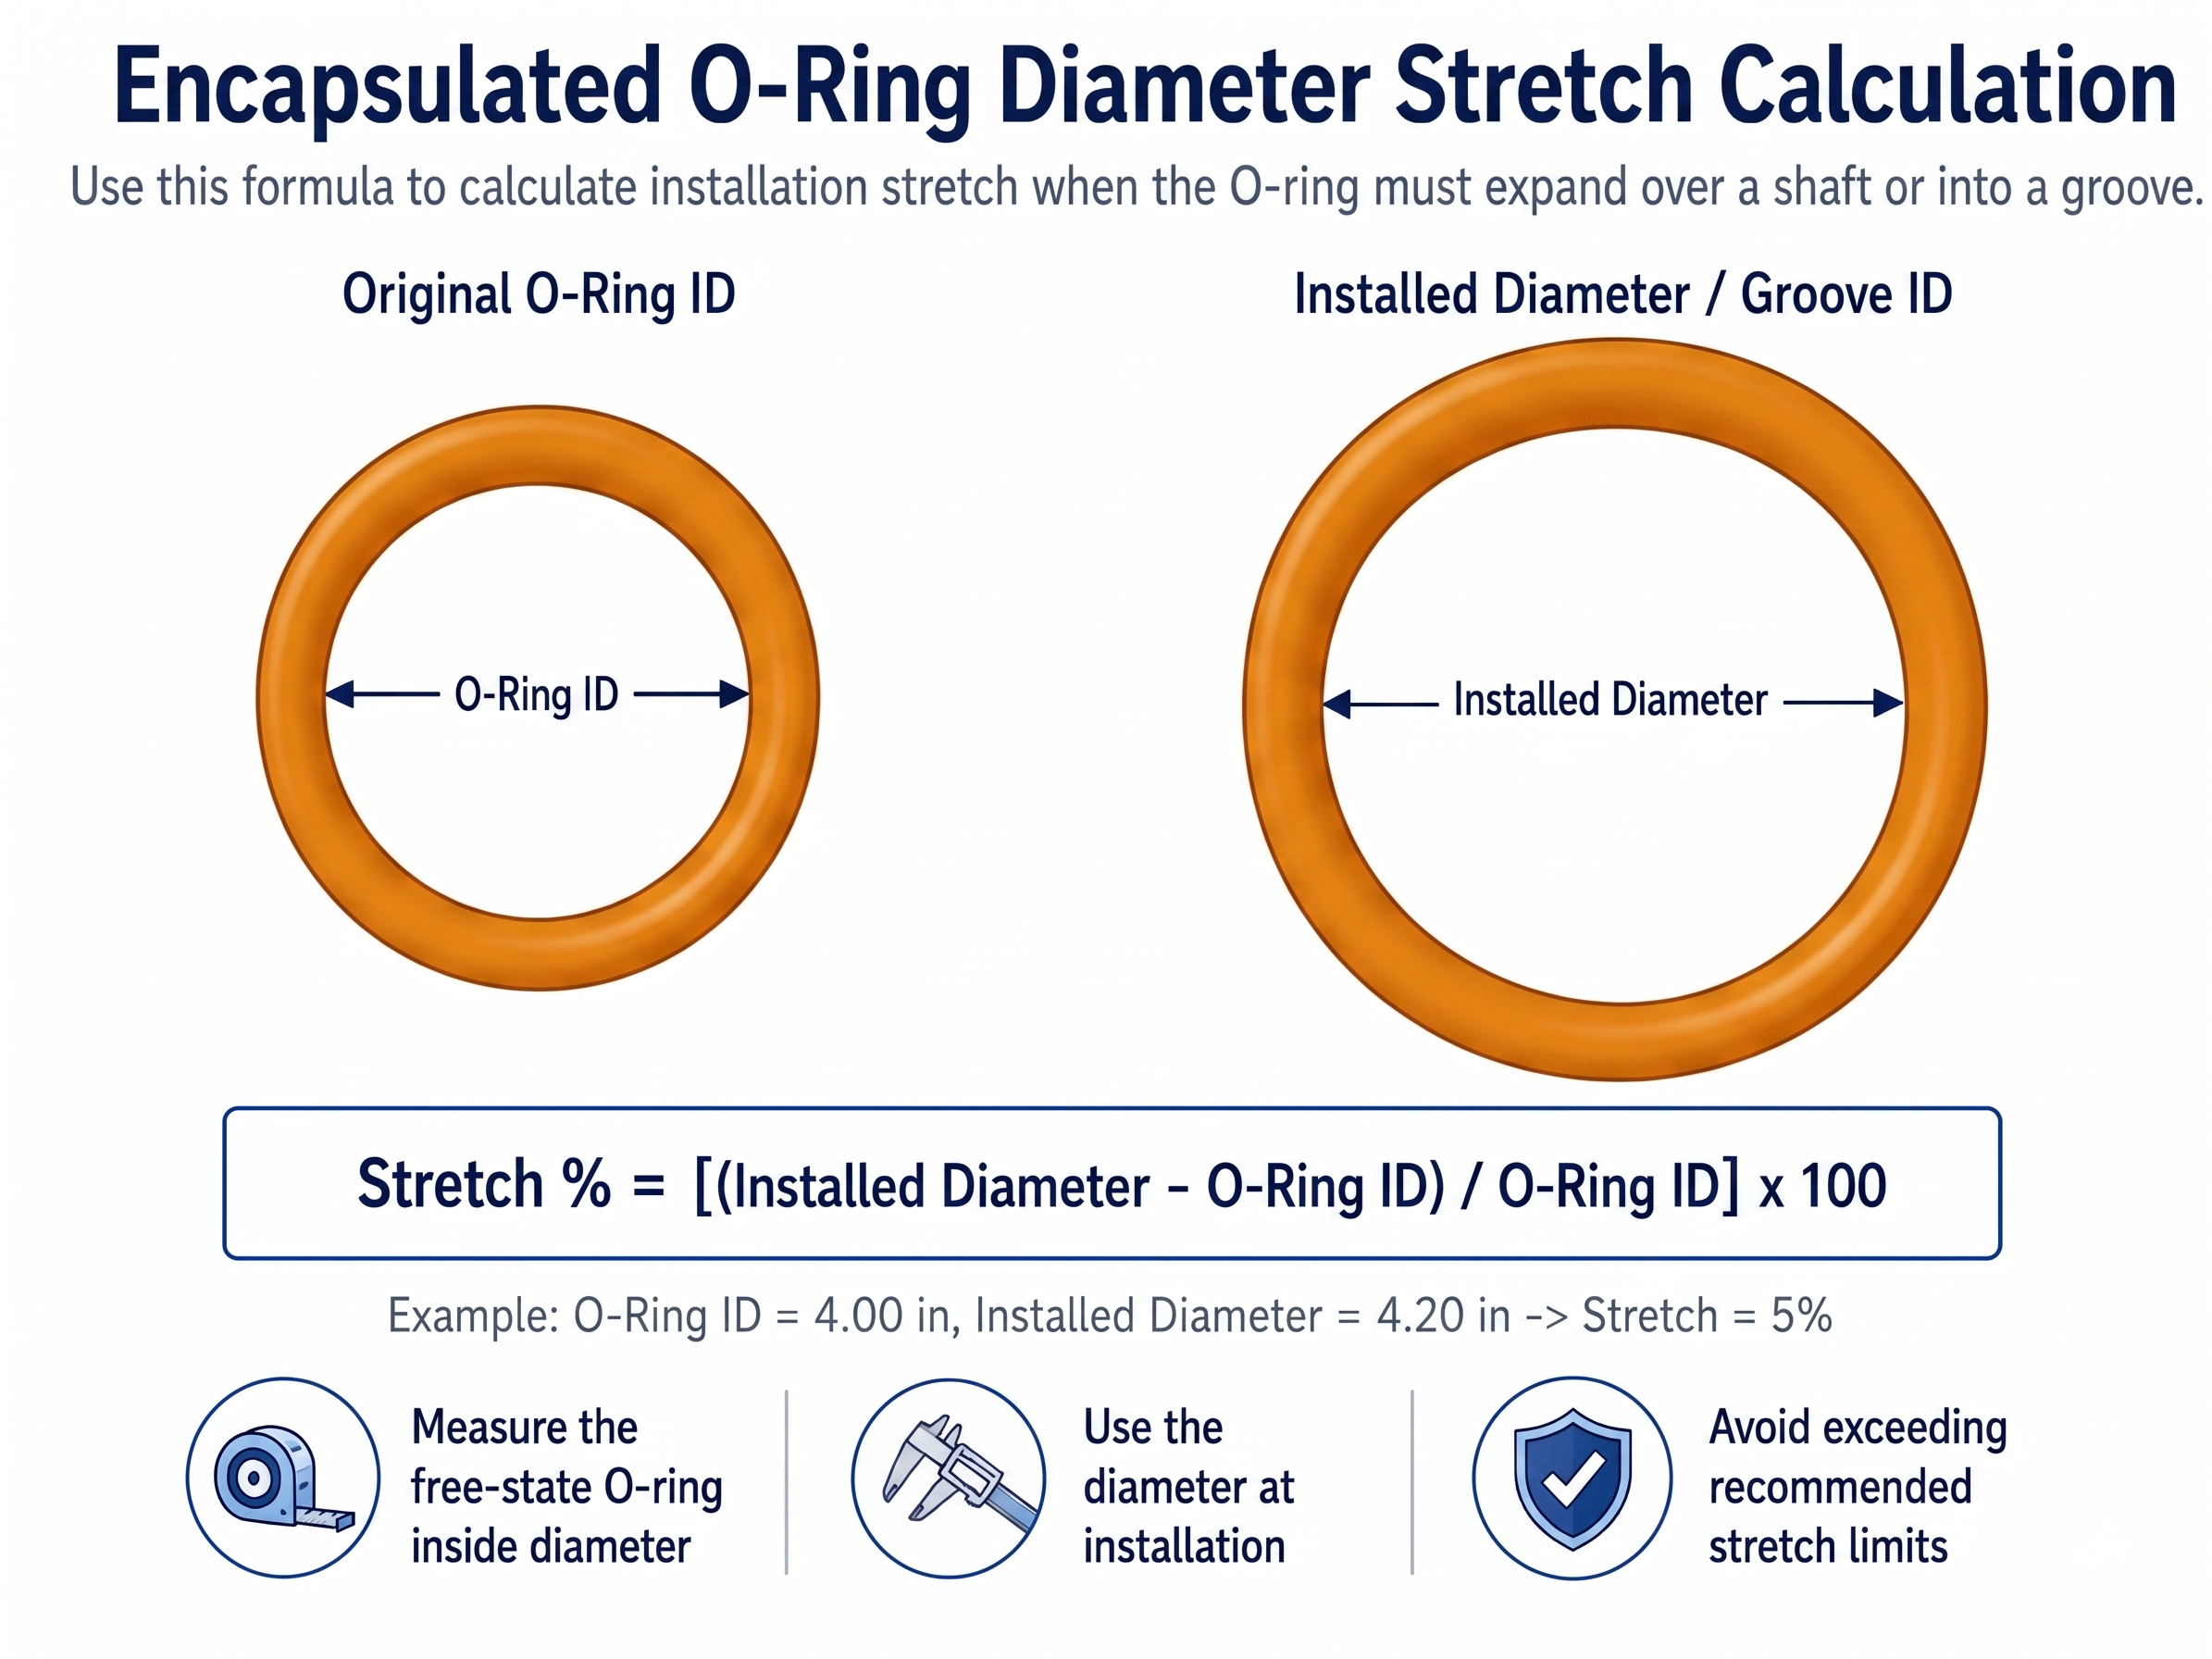
Stretch % = [(Groove ID − O-Ring ID) ÷ O-Ring ID] × 100
Silicone-Core Encapsulated O-Ring
Recommended max installation stretch: 8%
Better flexibility than FKM-core constructions, but still requires controlled handling.
Viton®/FKM-Core Encapsulated O-Ring
Recommended max installation stretch: 6%
Lower recommended stretch due to core stiffness and installation recovery behavior.
Engineering note: These are general installation guidelines. Smaller inside diameters, larger cross-sections, cold seals, tight grooves, and sharp hardware can reduce safe installation flexibility.
Step 5 — Install Without Twisting, Pinching, or Kinking
After heating, install the O-ring while it is still warm and flexible. Apply even pressure around the circumference. Do not pull the seal from one small point.
- Use smooth, rounded installation tools only when needed.
- Do not use screwdrivers, picks, knives, or sharp metal tools.
- Do not twist the O-ring during installation.
- Do not trap the seal between mating hardware surfaces.
- Seat the O-ring evenly around the full groove.
Step 6 — Allow the O-Ring to Cool and Recover
Once installed, allow the O-ring to cool to room temperature before closing the gland or placing the assembly into service. Cooling allows the FEP or PFA jacket and elastomer core to stabilize after installation.
If the seal was stretched during installation, recovery time helps the O-ring settle into its installed shape. Do not immediately clamp a distorted, twisted, or unevenly seated seal.
Step 7 — Apply Compatible Lubrication When Appropriate
A clean, light lubricant can reduce abrasion during installation. The lubricant must be compatible with the process media, seal materials, equipment, and customer validation requirements.
Lubrication May Help When
- The installation is tight
- The seal must pass over a surface
- Friction could damage the jacket
- Hardware is clean and compatible with lubricant
Confirm Approval For
- Pharmaceutical applications
- Food-contact applications
- Medical applications
- Semiconductor or high-purity applications
Step 8 — Final Inspection Before Assembly
Before closing the gland, inspect the installed O-ring. If the seal shows visible damage, do not place it into service without engineering review.
- Confirm the O-ring is seated evenly.
- Check for cuts, gouges, jacket folds, or flat spots.
- Confirm the seal is not twisted or pinched.
- Remove contamination from the sealing area.
- Verify that the mating hardware closes without shearing the seal.
Compression and Groove Design
Teflon® encapsulated O-rings require proper compression to seal effectively. The gland should allow the O-ring to compress enough to seal without crushing the jacket or preventing the seal from seating correctly.
As a general guideline, encapsulated O-rings often require approximately 20% compression of the cross-section in many static applications. Final gland design should be reviewed against the actual application, hardware, pressure, media, and temperature.

For critical applications: provide M-Cor with the groove ID or OD, groove width, groove depth, hardware drawing, media, temperature, pressure, and any inspection requirements.
Common Installation Mistakes
Installing Cold Into a Difficult Groove
Increases the risk of jacket cracking, folding, or overstretching.
Pulling From One Point
Creates uneven stress and can locally damage the FEP/PFA jacket.
Using Sharp Tools
Screwdrivers, picks, and knives can cut or gouge the encapsulation.
Stretching Beyond Recommended Limits
Can reduce seal life and prevent the O-ring from recovering properly.
Closing the Gland Too Soon
Can pinch, shear, or permanently damage the seal.
Ignoring Burrs or Threads
Sharp hardware can damage the jacket during installation.
Assuming It Installs Like Rubber
Encapsulated seals require more care because of the thermoplastic jacket.
When to Contact M-Cor Before Installation
Contact M-Cor before installation if the application involves difficult geometry, high stretch, critical service, or special documentation requirements.
- The O-ring must stretch more than the recommended installation limit.
- The seal must pass over threads, ports, keyways, or sharp shoulders.
- The part has a small inside diameter or a large cross-section.
- The application is semiconductor, pharmaceutical, food, medical, aerospace, or high-purity.
- The customer requires special inspection, certification, traceability, or documentation.
- The seal will be exposed to aggressive chemicals, high temperature, or unusual pressure conditions.
Related M-Cor Resources
Continue learning about encapsulated O-ring materials, tolerances, and applications.
Need Help With an Encapsulated O-Ring Installation?
M-Cor can review your gland design, installation method, material selection, inspection requirements, and application conditions before production.
Teflon® and Viton® are registered trademarks of their respective owners. Use of these names is for material identification only.